Goal (Terminal Objective):
Students will understand how to create multiple images on a painted surface to create a unique positive negative op art design.
Objective:
Students will compose and build a textured surface for printmaking using cardboard and rubber bands or string to create a piece of op art.
National Standards:
Visual Arts Grades K5 Content Standard 1: Understanding and applying media, techniques, and processes
Visual Arts Grades K5 Content Standard 2: Using knowledge of structures and functions
Visual Arts Grades K5 Content Standard 3: Choosing and evaluating a range of subject matter, symbols, and ideas
Visual Arts Grades K5 Content Standard 4: Understanding the visual arts in relation to history and culture
Visual Arts Grades K5 Content Standard 5: Reflecting upon and assessing the characteristics and merits of their work and the work of others
Visual Arts Grades K5 Content Standard 6: Making connections between visual arts and other disciplines (Cross Curriculum Connections: Mathematics and Science)
Purpose:
Students will investigate artists and techniques and create a positive negative design with repeated pattern.
New Vocabulary:
positive, negative, gloss, glue, register, craftsmanship, grid reversal, op art, opposites
Materials:
#22-1507 Liquid Metallic Markers
#22-7251 Liquid Metallic Markers
#22-8808 Gloss Medium
#24-2499 Acrylic paints
#22-7244 144 ct. Graphic Pencils

#22-1565 4 ct. Black Fine Bullet Tip

#23-5027 60 sheet Sketch Pad
#56-3101 40 ct. Flat Jumbo Brush Best-Buy Set
Cardboard, Masonite or hardboard, newspaper, , black permanent markers to label back side of the cardboard, paper for printing, assorted foam brushes, foam plates to use as palettes, masking tape, a printer for copying and printing images, hair dryers to speed drying time
Time:
35 (40 minute) classes as well as open studio/enrichment time
Introduction and Motivation (Set):
Analyze visuals of the positive and negative patterns and op art images. Discuss their use of lines and shapes and how the artists indicated and built reversals in their art work.
Then show them completed examples of several positive negative designs done with paint or collaged with fabric and paper. Look at the work of Victor Vasarely and Bridget Riley and discuss them
Instruction:
After viewing a PowerPoint presentation of the preparation of the cardboard, the teacher will do a modeled demonstration of applying the string or rubber bands to the board and show examples of completed pieces ready for printing. This PowerPoint can be loaded onto a classroom computer for reference or to assist students who are absent or late for class.

The teacher will then give another PowerPoint that gives an overview of artists listed above and others (both contemporary and through the ages) who have used positive negative reversals as the focal point for work. Students will record information and ideas about them in their sketchbooks. A rubric of how the project will be assessed will be discussed and recorded and posted on the wall of the classroom for easy and accessible reference.
Activities:
(1) Guided Practice:
- Students will follow the steps demonstrated on the PowerPoint presentation to prepare their cardboard printing plate. They will coat it with gloss medium to make it water resistant.
- After doing their artist research and developing a plan in their sketchbooks, students will apply a layer of rubber bands or string around the board and secure it with tape on the back side of the cardboard.
(2) Independent Practice and Check for Understanding:
- Students will select a line design, record it in their sketchbook, and choose rubber bands or string to assemble on to the cardboard with Gloss Medium.
- When dry, students will ink the plate with acrylic paint applied with paint brushes and stamp their image several times on to paper, inking in between each stamping application.

Repeated Stamping of Cardboard Plate - When dry, students will use the same printing plate but use a different color of paint to stamp several times onto black paper.
- Students will select their best print from both sets of prints, cut them out, and give them to the teacher to print reversals of them on the printer.
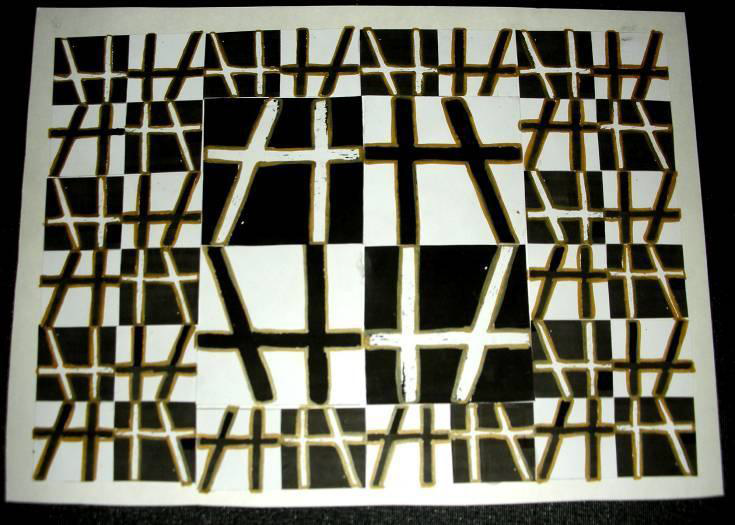
- These are cut and arranged in an interesting reversal order on to cardboard. Reducing the size and printing more images can create more interest in the reversal compositions. Glue them into position and let it dry.
- Students will use oil pastels and/or Liquid Metallic Markers to emphasize the outlines of their compositions.
- The teacher will circulate around the studio recording student progress and their exchange of ideas and techniques with their peers.
- The teacher will assist and reinforce students with the execution and completion of their work.

Printed Pieces, mirrored or flipped by printer, chosen to emphasize Reversals
(3) Closure:
- Students will follow the timeline allotted for the project, complete the print, and present it on the due date.
- Students will tape the rubric/checklist to the back of their competed printing.
- Students will give a reflective oral critique of their work for assessment. It must include:explanation of techniques used in paintingcraftsmanship
what could be done to improve it

Detail of Print with Reduced Images and Reversals done on Printer
Evaluation:
Drawings in the sketchbooks and rubrics are graded as well as the completed project.
Level One- The op art reversal print is accomplished according to the criteria and directions and shows a strong sense of design in layout of the composition using the elements and principles of design. The work demonstrates excellent quality.
Level Two- The op art reversal print indicates complex decision making with some success in the layout of the composition using the elements and principles of design. They followed the directions and criteria. The technique and quality of the work is generally strong.
Level Three- The op art reversal print shows a limited execution of design without much success, with an awkward use of media and composition. Evidence of following the directions and criteria is minimal. The technique and quality of the work is of weak quality.
Level Four- The op art reversal print is undeveloped and the use of design is questionable. Evidence of following the directions and criteria is lacking, with little evidence of decision making. The technique and quality of the work is of poor quality.
Extensions: These op art reversal print techniques can be applied to any work that involves areas of pattern in the composition. They can be as a method of filling background or negative space, and used for surface embellishment on two and three dimensional pieces.
Resources:
Use WIKIPEDIA to start your research and documentation. Cite sources following MLA format. Then research the links provided, Google, Artcyclopedia, Vivisimo, etc.
After researching the artists listed above, also investigate these sites:
http://theartists.org/artists
http://www.geom.uiuc.edu/demo5337/Group4/Opart.html
http://www.princetonol.com/groups/iad/lessons/middle/AmyPosNeg.htm.
http://www.darmouth.edu/~matc/math5.pattern/lesson6art.html
Textbooks and Resource Library Books:
- Creative Artist, LeLand, Nita, 1990, North Light Publications
- Creative Composition & Design, Dews, Pat, 2003, North Light Publishers
- Design Basics, Lauer & Pentak, 2002, Wadsworth Publishers
- Exploring Visual Design, Gatto, Porter & Selleck, 2000, Davis Publications
- Painters’ Wild Workshop, Loscuttoff, Lynn, 2002, Rockport Publishers, Inc.
- The Visual Arts Companion, Smolucha, 1996, Prentice Hall Publishers
Art Consultant