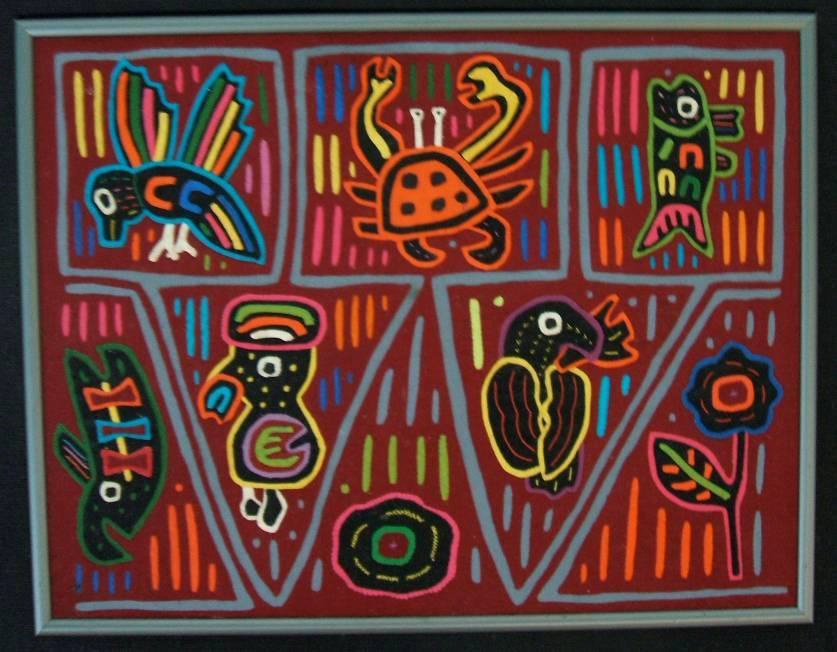

Molas are the colorful, richly decorated art works made by the Kuna Indian women who live on the San Blas Islands near Panama. Many layers of cloth are stitched together by hand. Their images depict animals, nature, and everyday life. The average mola is 16” x 19” and takes about two months to complete.
Goal (Terminal Objective):
Students will create visual artworks that address personal interests through acquired knowledge of the Kuna Indians. These artworks will show students’ understanding and respect of the Kuna Indian culture.
Objective:
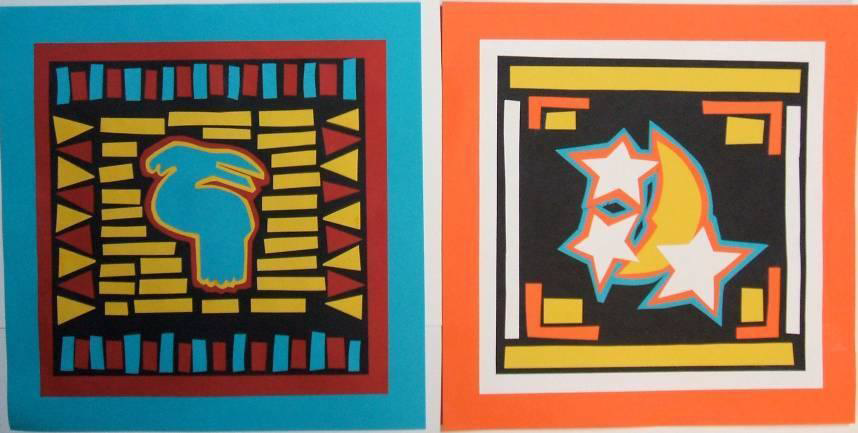
Students will design an original (traditional or nontraditional image) paper mola collage, using layers of paper and markers. Students will develop their ideas around the principles and elements of design. Completed art works will incorporate traditional and contemporary symbols and patterns.
National Standards:
Visual Arts Grades K4 Content Standard 1: Understanding and applying media, techniques, and processes
Visual Arts Grades K4 Content Standard 2: Using knowledge of structure and functions
Visual Arts Grades K4 Content Standard 3: Choosing and evaluating a range of subject matter, symbols, and ideas
Visual Arts Grades K4 Content Standard 4: Understanding the visual art in relation to history and culture
Visual Arts Grades K4 Content Standard 5: Reflecting upon and assessing the characteristics and merits of their work and the work of others
Purpose:
Students will compare and discuss commonalities and differences in their own environments/cultures and those of the Kuna Indians, referring specifically to the importance of mola art as their livelihood. The completed mola collages will help students understand how every culture is unique and how art tells us who we are.
New Vocabulary:
mola, Kuna Indians, San Blas Islands, traditional, contemporary, image, pattern, focal point, collage, template, embellish
Materials:
#22-1403 8g, washable glue stick
#22-1530 8ct. classic broad tip peggable carton
#22-1894 10 ml washable classic glitter glue tubes
#22-7244 144 ct. Graphite Pencils

#23-40xx 50 ct. Construction Paper Pack

#22-0914 12 ct. Pointed Tip Student Scissors Best-Pack
Pencils, construction paper, scissors
Time:
3 lessons (4560 minutes each)
Introduction and Motivation (Set):
- Teacher introduces students to the Kuna Indians and mola art. Students view several mola artworks and discuss how they are made. Students can see the tiny stitches that sew the layers of cloth together.
Does it take a long time to make a mola? What can you tell about the Kuna Indians just from seeing photos of them and their mola art? What do you think their lives are like? If women make the molas, what are the jobs of the men on the San Blas Islands? - Teacher introduces new vocabulary.
- Teacher asks students to look at traditional images used by the Kuna Indians. What types of images are not found? Each student sketches a traditional or non traditional image for the focal point of the paper mola collage.
Instruction:
Lesson 1:
Teacher presents pictures and slides of authentic molas. Introduction includes group discussion about the Kuna Indian culture and what it would be like to live on the San Blas Islands. What images are found in molas? Why are these images used? What materials are used? Students think about images that impact their own lives. They look at teacher exemplars. After teacher demonstrates, students use pencils to sketch ideas for their mola images. (For younger students, teacher may make templates to trace.) The image is cut out and drawn on colored construction paper. The image is pasted on a second color of paper and cut out, allowing a border of the second color to show. The process is repeated on a third color. The layered image is pasted on a 9”x9” piece of black construction paper.

Lesson 2:
How are the backgrounds of molas designed? Teacher emphasizes the Elements of Design. Teacher demonstrates cutting shapes from construction paper and creating a pattern of shapes and colors around the mola image. Teacher demonstrates pasting the paper shapes into the background. Students cut paper shapes for their backgrounds and paste them around their mola images. Students paste their collages on 10”x10” paper and then on 12”x12” paper.

Lesson 3:
Teacher demonstrates embellishment of the mola collage. A review of line drawing (thick, thin, curved, angled, and stippling) is given. Markers are used to detail the original mola image and background shapes. Black markers create the effect of stitching between the layers of paper. Teacher demonstrates how to hold glitter glue to embellish the border and selected sections of the collage. Students complete their molas. (Allow time for glitter glue to dry.) Teacher exhibits completed collages and allows students time to evaluate their own work and appreciate the work of others.

Activities:
(1) Guided Practice:
- Students learn about mola art and the Kuna Indians. Students watch teacher’s stepbystep demonstrations and discuss teacher exemplars.
- Students create an original mola collage using Sargent Art markers, glue sticks, and glitter glue. (Clean up with soap and water. Storage on drying racks.)
(2) Independent Practice and Check for Understanding:
- Teacher circulates through the room during student work time, answering questions and offering support as needed.
- Teacher notes students’ understanding of directions and reviews them with the class if necessary.
(3) Closure:
- Students show their mola collages to the class and tell what they like about the traditional or nontraditional images they chose to include.
- Students discuss the importance of respect for individuality.
Evaluation:
Level One- The artwork conveys good knowledge of mola art and includes many design elements. The selected image is very recognizable and detailed. Craftsmanship is excellent. Student handles materials with confidence. The background pattern shows a strong sense of originality and balance. The collage pieces look stitched together.
Level Two-The artwork conveys knowledge of mola art and design elements. The selected image is recognizable and somewhat detailed. Craftsmanship is good. Student handles materials with some confidence. The background pattern is original and somewhat balanced. The collage pieces look stitched together.
Level Three- The student has made an effort to convey some knowledge of mola art and use design elements. The selected image is not very recognizable. It lacks detail.
Craftsmanship is fair. Student handles materials with varied confidence. The background pattern is original but not wellbalanced. The student has attempted to stitch some collage pieces together with marker.
Level Four- The artwork does not convey knowledge of mola art and does not use design elements. The selected image is not recognizable and there is no detail.
Craftsmanship is poor. Student needs much support in handling materials. The background pattern shows no understanding of balance. The collage pieces have not been stitched together with marker.
Extension:
Teacher can make copies of mola pictures found in The Mola Design Book, by Caren Caraway. Students use markers to complete beautiful mola pictures. Students can watch the video/DVD, Paper Molas, available through the “Art Is” video series.
Resources:
http://en.wikipedia.org/wiki/mola_(art_form)
http://www.panart.com/mola_gallery.htm
http://www.princetonol.com/groups/iad/lessons/middle/molas.htm
http://www.escat.org/rclarkinia/pdfs/design_principles.pdf
Also search the web under Mola Art, Kuna Indians, and San Blas Islands.
Art Consultant